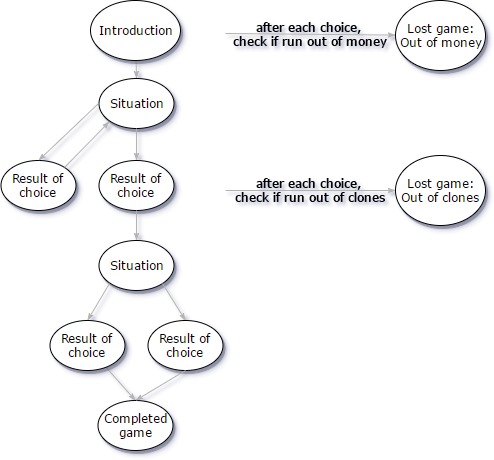
A Guide for the Prospective Alchemist
The following is a walkthrough of my Alakajam game, "The Hermetic Order of Alchemists".
It describes not only the steps necessary, but also why the steps are necessary, which might help you in the later steps or Trials.
...or you can just follow the bolded actions, if you just want to move ahead to the ending.
Trial 1: Produce a Resum Crystal
Objective:
Both the goal and the initial substance has the same amount and type of elements. So you need to break the initial Pure Resum substances down into their Resum elements. Then, make them bond into the goal substance Crystallized Crystal.
Solution:
Step 1:
By hovering the mouse over the starting substances, you can see that Pure Resum has a breaking point of Weak Heat. So start by applying Weak Heat (or hotter). This breaks the substances into 4 elements of Resum.
Step 2:
Hover the mouse over the Crystallized Resum under the Expected trial result, or look it up in the Grimoire. Note that the Bonding point of Crystallized Resum is Strong Cold. Apply Strong Cold (or colder) to form the 4 Resum Elements into Crystallized Resum. Note that if you had instead applied Weak Cold or Room Temperature, the Elements would turn back into Pure Resum instead, since the Bonding point of Pure Resum is Room Temperature. The Reactivity of Crystallized Resum is 8, which is higher than Pure Resum's Reactivity of 2. This is why Crystallized Resum form before Pure Resum, if the temperature you apply, is cold enough to be the same (or colder) than the Bonding point of both of these materials.
Trial 2: Produce Bluemetal from raw materials.
Objective:
The starting substances contain two extra Pyx (green) elements, and 1 extra Resum (purple) element, compared to your goal. You therefore need to get rid of these. In the Grimoire, you can see that the substance of Resrem contains exactly the combination of elements you need to remove. Therefore, your goal is to bond some of the starting elements into Resrem, so that you can remove them. The rest of the elements will then be Bluemetal.
Solution:
Step 1:
Start by breaking the starting substances. Hovering over each of them, you can see that the warmest breaking point across them is Searing Heat. So start by Applying Searing heat.
Step 2:
Now, you must rebond the elements. The objective is to bond your surplus elements into a single substance (Resrem), which you can then remove. Looking in the Grimoire, you can see that Resrem has a bonding temperature of Strong Cold. Apply Strong Cold in order to bond the elements into a Resrem and a Bluemetal.
Step 3:
Finally, use filter to remove the smallest substance. Since Resrem has a size of 3 elements, and Bluemetal has a size of 5 elements, this will remove the Resrem, but leave the Bluemetal in the solution.
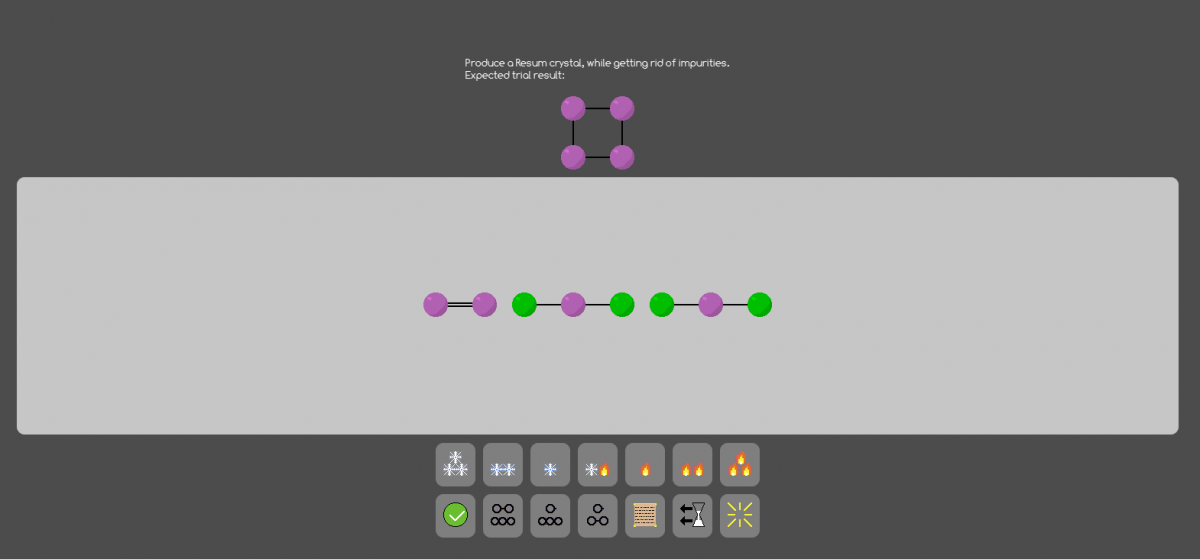
Trial 3: Produce a Resum Crystal, while getting rid of impurities.
Objective:
The starting substances contain four extra Pyx (green) elements, compared to your goal. You therefore need to get rid of these. Unfortunately, Resrem is more reactive (and has the same Bonding point) than Crystallized Resum, so you can't use the filtering strategy from Trial 2. Instead you have to form the Resum elements into stable substances, and then purge the unbonded Pyx.
Solution:
Step 1:
Start by breaking the starting substances. Hovering over each of them, you can see that the warmest breaking point across them is Searing Heat. So start by applying Searing heat.
Step 2:
Looking in the Grimoire, you can see that the only substance which only contains Pyx is Pure Pyx. Unfortunately, at its Weak Cold Bonding point, you also find Duresrem, which contains both Pyx and Resum, and which has a higher reactivity than Pure Pyx. So in this case, you cannot isolate the Pyx-elements for filtering. But what you can do, it to find a substance which can bond all of the Resum elements. Then you can purge the unbonded Pyx-elements. In the Grimoire, there are two substances which only contains Resum: Crystallized Resum have a bonding point of Strong Cold, but so does Resrem, and Resrem has a higher Reactivity. However, Pure Resum has a bonding point of Room Temperature, which is warmer than any substance containing Pyx. So apply Room Temperature, in order to bond the Resum elements into Pure Resum, leaving the Pyx elements unbonded.
Step 3:
Use Purge to remove the unbonded Pyx elements.
Step 4:
As in Trial 1, use Weak Heat to break the Pure Resum substances.
Step 5:
Finally, as in Trial 1, use Strong Cold to bond the Resum elements into Crystallized Resum.
Trial 4: Reduce substances to Oprem, while getting rid of impurities.
Objective:
Similar to Trial 3, you need to remove extra elements. But the Reactivity of the possible substances means, that you cannot just break the starting substances, and then apply some degree of cold. Instead, you need to isolate and remove the extra elements, in this case two elements of Resum, before you can bond the remaining elements into your goal substances.
Solution:
Step 1:
Start by breaking the starting substances. Hovering over each of them, you can see that the warmest breaking point across them is Searing Heat. So start by Applying Searing heat.
Step 2:
In Trial 4 you saw that Pure Resum can be easily isolated, since it is the only substance which bonds at Room Temperature. So next, apply Room Temperature.
Step 3:
Now you can use Filter to remove the Pure Resum.
Step 4:
As Oprem has a bonding point of Strong Cold, finally apply Strong Cold to form the remaining elements into Oprem.
Trial 5: Refine Equilibrica from inferior substances.
Objective:
As for earlier Trials, the supplied substances contain extra elements which much be removed. As in Trial 2, the two extra Pyx (green) elements, and 1 extra Resum (purple) element correspond to the elements in Resrem. However, since there are enough elements to create two Resrem substances, you need to bind some of the elements into something different. This leaves only enough elements to bind into a single Resrem, which can then be removed.
Solution:
Step 1:
Start by breaking the starting substances. Hovering over each of them, you can see that the warmest breaking point across them is Searing Heat. So start by Applying Searing heat.
Step 2:
Pure Optium is both very Reactive, and rather temperature stable (it bonds at Freezing Cold, and breaks up at Strong Heat). Tying up the Optium elements first, will ensure that they do not "get in the way" of the later bonding into Resrem. So next, apply Freezing Cold.
Step 3:
The previous step also formed two Resrem elements. You therefore need to break these back into elements. Apply Weak Heat to do so. The Pure Optium will not be changed, since its breaking point is Strong Heat.
Step 4:
Now, you need to find a way to leave only enough unbonded elements to bond into a single Resrem. Since that bonds around a single Resum element, you can bind two Resum elements into Pure Resum, leaving a single unbonded Resum element. As you saw earlier, Pure Resum can be bonded at Room Temperature, so apply Room Temperature next.
Step 5:
Now you can finally form a single Resrem, by applying Strong Cold.
Step 6:
Resrem is the largest substance, as it contains three elements. So Separate it with the Separate tool.
Step 7:
Break up the previously bonded substances, by applying Searing Heat.
Step 8:
Finally bond the elements into Equilibrica by applying Weak Cold.
Final Trial: Refine Bluemetal from Equilibrica
Objective:
The final trial is the hardest, since there are enough elements to form any substance except Crystallized Resuml. Hence, the solution requires mastery of the various properties of these substances. You need to get rid of all the extra elements: 7 Pyx elements, and one Optium element. A logical approach would be to try to get rid of the extra Optium element first, since Optium is a part of most of the substances. After that, you can focus on getting rid of the extra Pyx.
Solution:
Step 1:
Start by breaking the starting substances. Hovering over each of them, you can see that the warmest breaking point across them is Searing Heat. So tart by Applying Searing heat.
Step 2:
Removing the single extra Optium element is the easiest. Start by forming the two other Optium elements into Pure Optium. Do this by applying Freezing Cold.
Step 3:
Purge the unbonded Optium element. As an added bonus, this also gets rid of one of one of the extra Pyx elements.
Step 4:
Break down all the temporary substances again, by applying Strong Heat.
Step 5:
Since there is an even amount of Pyx Elements left, the next sub goal is to merge them into Pure Pyx pairs, which can then be removed. This would leave only the correct elements. But unfortunately, Pure Pyx has the lowest Reactivity of all substances, and a bonding temperature of Weak Cold. This means that almost any other possible substance will bond before Pure Pyx will. The next step is therefore to bind enough of the Optium and Resum elements, so that the remaining Pyx elements can only bond into Pure Pyx. The first step is to bind the Optium Elements into Pure Optium. Do this by applying Freezing Cold.
Step 6:
Apply Weak Heat to break up the Resrem. This does not affect the Pure Optium.
Step 7:
Looking in the Grimoire, you can see that if you can get 2 of the remaining 3 Resum elements to bond into Pure Resum, the remaining Resum element can only bond into Resrem. As you saw earlier, Pure Resum is easy to bond, since it is the only substance which bonds at Room Temperature. So apply Room Temperature next.
Step 8:
Now the remaining elements can only form two different substances: Resrem or Pure Pyx. And as Pure Pyx bonds at a colder temperature than Resrem, you can choose which substance to bond. Apply Weak Cold to form the remaining Pyx into Pure Pyx pairs.
Step 9:
Apply Strong Heat, in order to break the Pure Resum and Pure Optium back into unbonded elements. As Pure Pyx has a breaking point of Searing Heat, these are left unbroken.
Step 10:
Now you can finally get rid of the Pyx, by filtering!
Step 11:
Bluemetal bonds at Weak Cold, so apply Weak Cold in order to bond the remaining elements.